Sabtu, 19 Maret 2011

HTML Cara Pasang Gambar atau Foto

Terkait dengan blogger dan ingin cara pasang gambar di blog anda.
inilah cara termudah, selanjutnya lakukan yang anda lihat di sini
Untuk memasang Gambar /Foto di Blog atau web, kita perlu mengatahui dulu alamat foto/gambar yang kita ingin tampilkan, Dahulu sudah agak lama saya bahas mengenai Cara menyimpan foto/gabar di internet salah satunya dengan menggunakan layanan Gratisan www.photobucket.com di sana juga anda sudah mendapatkan layanan yang saya rasa cukup memuaskan mulai dari pengaturan folder penyimpanan foto (album) modifikasi gambar secara online, dan Beserta kode gambar yang siap anda pakai untuk di pasang pada blog anda.

Di sini saya hanya memberikan sedikit gambaran atau cara untuk menampilkan gambar pada blog.

Kode yang di perlukan adalah kode ini: <img src="url gambar anda" alt="deskripsi gambar" width="x% atau xpx" height="y% atau ypx"/>
  • Supaya tidak terjadi masalah pada browser anda pastikan di akhir kode image gunakan /> itu menandakan penutup kode, pada awalnya kode Image tidak memerlukan penutup kode tapi pada perkembangannya, harus memiliki kode penutup, selain tiu anda bisa menggunakan kode </img> dengan catatan tidak menggunakan kode /> contohnya: <img src="...." > </img>.
  • SRC adalah URL gambar yang akan di pasang.
  • Width untuk menentukan lebar gambar, satuannya dalam pixel atau persentase, Untuk gambar yang ingin di tampilkan apa adanya, silahkan hapus kode width="......"
  • Height untuk menentukan tinggi gambar, satauannya sama seperti width yaitu persentase dan pixel.
  • ALT adalah kode untuk mendeskripsikan sebuah gaambar yang anda maksud hal ini berguna untuk mesin pencari menemukan gambar yang sesuai di cari.
selain kode di atas, masih banyak parameter atau kode tambahan untuk tag IMG.

Sabtu, 05 Maret 2011

Integrated peripherals


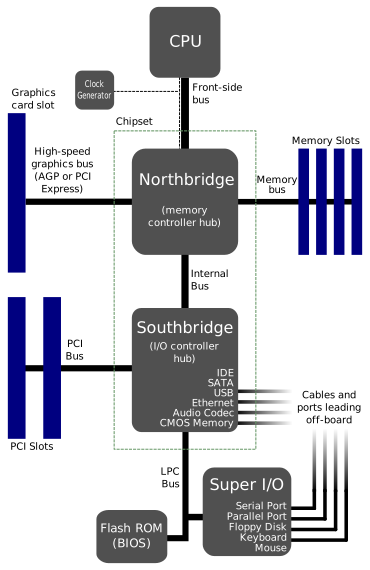
Block diagram of a modern motherboard, which supports many on-board peripheral functions as well as several expansion slots.
With the steadily declining costs and size of integrated circuits, it is now possible to include support for many peripherals on the motherboard. By combining many functions on one PCB, the physical size and total cost of the system may be reduced; highly integrated motherboards are thus especially popular in small form factor and budget computers.
For example, the ECS RS485M-M,[6] a typical modern budget motherboard for computers based on AMD processors, has on-board support for a very large range of peripherals:
Expansion cards to support all of these functions would have cost hundreds of dollars even a decade ago; however, as of April 2007 such highly integrated motherboards are available for as little as $30 in the USA.

Peripheral card slots

A typical motherboard of 2009 will have a different number of connections depending on its standard.
A standard ATX motherboard will typically have one PCI-E 16x connection for a graphics card, two conventional PCI slots for various expansion cards, and one PCI-E 1x (which will eventually supersede PCI). A standard EATX motherboard will have one PCI-E 16x connection for a graphics card, and a varying number of PCI and PCI-E 1x slots. It can sometimes also have a PCI-E 4x slot. (This varies between brands and models.)
Some motherboards have two PCI-E 16x slots, to allow more than 2 monitors without special hardware, or use a special graphics technology called SLI (for Nvidia) and Crossfire (for ATI). These allow 2 graphics cards to be linked together, to allow better performance in intensive graphical computing tasks, such as gaming and video editing.
As of 2007, virtually all motherboards come with at least four USB ports on the rear, with at least 2 connections on the board internally for wiring additional front ports that may be built into the computer's case. Ethernet is also included. This is a standard networking cable for connecting the computer to a network or a modem. A sound chip is always included on the motherboard, to allow sound output without the need for any extra components. This allows computers to be far more multimedia-based than before. Some motherboards have their graphics chip built into the motherboard rather than needing a separate card. A separate card may still be used.

Motherboard

THIS MOTHERBOARD.................
In personal computers, a motherboard is the central printed circuit board (PCB) in many modern computers and holds many of the crucial components of the system, while providing connectors for other peripherals. The motherboard is sometimes alternatively known as the mainboard, system board, or, on Apple computers, the logic board.[1] It is also sometimes casually shortened to mobo.[2]


Overview

A motherboard, like a backplane, provides the electrical connections by which the other components of the system communicate, but unlike a backplane, it also connects the central processing unit and hosts other subsystems and devices.
A typical desktop computer has its microprocessor, main memory, and other essential components connected to the motherboard. Other components such as external storage, controllers for video display and sound, and peripheral devices may be attached to the motherboard as plug-in cards or via cables, although in modern computers it is increasingly common to integrate some of these peripherals into the motherboard itself.
An important component of a motherboard is the microprocessor's supporting chipset, which provides the supporting interfaces between the CPU and the various buses and external components. This chipset determines, to an extent, the features and capabilities of the motherboard.
Modern motherboards include, at a minimum:
  • sockets (or slots) in which one or more microprocessors may be installed[3]
  • slots into which the system's main memory is to be installed (typically in the form of DIMM modules containing DRAM chips)
  • a chipset which forms an interface between the CPU's front-side bus, main memory, and peripheral buses
  • non-volatile memory chips (usually Flash ROM in modern motherboards) containing the system's firmware or BIOS
  • a clock generator which produces the system clock signal to synchronize the various components
  • slots for expansion cards (these interface to the system via the buses supported by the chipset)
  • power connectors, which receive electrical power from the computer power supply and distribute it to the CPU, chipset, main memory, and expansion cards.[4]
The Octek Jaguar V motherboard from 1993.[5] This board has 6 ISA slots but few onboard peripherals, as evidenced by the lack of external connectors.
Additionally, nearly all motherboards include logic and connectors to support commonly used input devices, such as PS/2 connectors for a mouse and keyboard. Early personal computers such as the Apple II or IBM PC included only this minimal peripheral support on the motherboard. Occasionally video interface hardware was also integrated into the motherboard; for example, on the Apple II and rarely on IBM-compatible computers such as the IBM PC Jr. Additional peripherals such as disk controllers and serial ports were provided as expansion cards.
Given the high thermal design power of high-speed computer CPUs and components, modern motherboards nearly always include heat sinks and mounting points for fans to dissipate excess heat.

CPU sockets

A CPU socket or slot is an electrical component that attaches to a printed circuit board (PCB) and is designed to house a CPU (also called a microprocessor). It is a special type of integrated circuit socket designed for very high pin counts. A CPU socket provides many functions, including a physical structure to support the CPU, support for a heat sink, facilitating replacement (as well as reducing cost), and most importantly, forming an electrical interface both with the CPU and the PCB. CPU sockets can most often be found in most desktop and server computers (laptops typically use surface mount CPUs), particularly those based on the Intel x86 architecture on the motherboard. A CPU socket type and motherboard chipset must support the CPU series and speed.


Cara Memasukkan Lagu Dalam Blog

inalah cara memasukan lagu dalam blog....

Sahabat blogger pasti pernah menjumpai salah satu atau beberapa blog teman anda yang akan menyairkan sebuah lagu ketika blog tersebut telah selesai meload elemen-elemen blognya.Gimana, menurut kamu bagus nggak model blog yang disertai syairan lagu tersebut ? kalau menurut kamu bagus dan menarik ya apa salahnya kalau kamu tambahkan elemen lagu itu ke dalam blog mu.sebenarnya cara yang harus kita lakukan untuk memasukan lagu kedalam blog itu sangatlah mudah, ya, langkahnya hampir sama dengan langkah-langkah yang harus kita kerjakan jika kita ingin memasukkan lagu ke dalam friendster.

Nah kalau kamu memang ingin memasukkan sebuah lagu kedalam blog kamu silahkan ikuti tutorial berikut ini :

1.seperti biasanya sign in duluh kedalam account blogger kamu

2.kemudian copy dan paste kode dibawah ini kedalam page element baru blog anda. Caranya : Di [Dashboard] klik tab [Tata Letak] kemudian tambah sebuah page element baru dengan mengklik tombol[Add a GadGad]>>>[html/java script]

<div align='center' style='font:bold 11px Verdana; width:310px'><a style='background-color:#eeeeee;display:block;width:310px;border:solid 2px black; padding:5px' href="http://www.codelagu.com/index.php?search=Nidji+-+Laskar+Pelangi&source=all" target='_blank' title='Nidji - Laskar Pelangi.mp3'>Nidji - Laskar Pelangi.mp3<br/><img border='0' src='http://img232.imageshack.us/img232/1337/iconmusicxc5.gif' width='310' height='51'><br/><embed name='RAOCXplayer' src='http://kodelagu.net/Playing/Nidji - Laskar Pelangi.Codes' type='application/x-mplayer2' width='310' height='45' autoplay='true' ShowStatusBar='0' ShowControls='1' EnableContextMenu='0' DisplaySize='1' loop='false' pluginspage='http://www.microsoft.com/Windows/Downloads/Contents/Products/MediaPlayer/' autostart='1' ></embed></a><div align='center'><a href='http://www.musik-live.net' target='_blank' title='Free Mp3 at www.musik-live.net'>Free Mp3 Codes Indo at www.musik-live.net</a></div></div>
Catatan :
“Kode yang tertera diatas adalah kode untuk lagu Laskar Pelangi Dari Nidji. lagu ini akan diputar secara otomatis ketika halaman blog anda dibuka.kalau anda mau anda juga dapat menggantinya dengan kode lagu lain, kodenya bisa anda dapatkan dari beberapa situs penyedianya secara gratis,diantara dari situs penyedia kode lagu tersebut adalah : http://www.musik-live.net/.”

3.setelah kode lagu tersebut di paste kedalam page elemen baru kamu tadi tekan tombol [save]

4.Selamat mencoba…!!!